Materials I used
|

|

|
|
For my final idea I decided to create a piece of embroidery, based on the structure of the beehive, as it is a natural structure formed by the bees. I decided on this idea, as I think that the structure of the beehive is very unusual and interesting, it is really impressive that such small creatures are able to create such uniform and precise architecture, all by chewing up the wax until it is soft and pliable, so it can be shaped into the honeycomb cells.
To begin my piece, I first had to go through all the fabrics I had on hand within my household, as we are currently on a lock down and we are unable to gain access to college and the materials there. I found a piece of brown felt that I thought would be a nice base, as beehives are quite warm toned with their browns, oranges and yellows, so I placed that within an embroidery hoop that I thought would be a suitable size for my final piece, fortunately I have quite a selection of embroidery supplies as it is something that I enjoy doing in my spare time, so I had enough materials for that. |

|

|

|
The next thing I did, was go onto my Ipad Pro and sketch out a plan of how I wanted my beehive to look, as they mostly consist of uniform hexagonal shapes. I decided to add two different sizes of hexagonal shapes to add a bit of depth and to make my piece look a bit more interesting. I also took this opportunity to do some colour experimentation, by filling some of the hexagons with block colour, to break the piece up a bit and to look as though they are filled with honey.
I then copied my design onto a piece of computer paper, and pinned it to my piece of felt. A bit of it got cut off as my design was too big, but that was okay.
I then copied my design onto a piece of computer paper, and pinned it to my piece of felt. A bit of it got cut off as my design was too big, but that was okay.

|

|
Next I sewn my design onto the felt, using the paper as a guide on where to place my stitches.
We did some sewing on paper previously when we were still attending our college campus, I knew to be careful with my stitches and not tug too hard on the paper, as it was very delicate.
We did some sewing on paper previously when we were still attending our college campus, I knew to be careful with my stitches and not tug too hard on the paper, as it was very delicate.

|

|

|
Once I had successfully sewn the design onto the felt. I then carefully began to remove the paper by tearing it gently. This took an awfully long time and it was very tedious, especially in the areas with the small hexagonal shapes. But I don't think it turned out too bad in the end, although I did go over some of the stitches that had gaps in them.

|

|
The next thing I did was fill in some of the hexagonal shapes, following my design that I had planned out digitally. This was when I could see the image really starting to come together.

|

|
I knew from the beginning that I wanted to incorporate Ana Teresa Barboza's technique of having the embroidery thread drape down below the hoop, so I decided to create some 'dripping honey' coming from the hive. To do this, I sewn several colours of thread at the bottom of my piece, like tassels on a scarf.
This process took a little while to do but as I added more threads, the more built up and complete the dripping honey effect looked.
This process took a little while to do but as I added more threads, the more built up and complete the dripping honey effect looked.

|

|
I also decided to add a piece of a golden mesh material I found, sort of acting like a little containment for the honey, and I draped the threads over it to act like a little waterfall of dripping honey oozing out. I also added some scrap fabric and wooden buttons to the 'honey pool' so it appeared more full.

|

|

|
I then decided to make a little bee to live in this hive, as It would be a nice little added detail. I sketched out his design onto some white Aida, as I had ran out of materials that would match my warm colour palette. I also added some sparkly white mesh to give the wings a bit of texture and to add a shine to them.

|

|

|
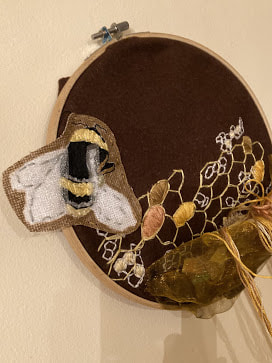
Once I had completed my bee, I cut him out and placed him alongside my design. The bright white Aida really stood out and not in a good way, so I decided to colour it in with a bronze marker I had lying around. Ideally I would have sewn the bee onto another brown piece of fabric, but this is all I had available to me at home. I then finally sewn this to my final piece, and it was complete.
I would have ideally liked to present my final piece in a gallery-setting within our college campus, but luckily I had a blank wall in my living room that I could use as an alternative. I also decided to keep my final piece within the embroidery hoop, as I personally think it refines it quite nicely, acting as a frame.
I would have ideally liked to present my final piece in a gallery-setting within our college campus, but luckily I had a blank wall in my living room that I could use as an alternative. I also decided to keep my final piece within the embroidery hoop, as I personally think it refines it quite nicely, acting as a frame.
|
Overall, I think this piece came out pretty good, regarding a lack materials due to Covid-19.
I think my idea of using the beehive as a natural structure was quite different and original, so I am glad I went with it. I also hope that it can make others think about how incredible bees actually are, as I know they are unfortunately endangered and I hope it can maybe convince some people to think twice when they run away in fear of getting stung, and maybe they can even plant some flowers in their garden to help the bee population grow again. I love the 3D aspect that the little honey catchment area gives, and I would definitely like to do more pieces similar to this in the future, as I had a lot of fun working on it. It is a real shame that we were cut short for this unit due to Covid-19, as I would have been very keen to try more techniques for my final piece, but there is always next time. Ideally I would have liked these piece displayed on a bright white wall in my college although my cream living room wall had to suffice, but I don't think it looks too bad, the cream matches the colour scheme although the lighting is a bit off as I couldn't get rid of the shadows. |

|
Some Close-ups

|
|
